
This article describes users in your Ringba account. Depending on their role, different users have access to different data and features in your account. You invite users to your account and Ringba sends them an invitation link via email. The user clicks the link to accept the invitation. Then the user sets up a password and multi-factor authentication, if they don't have them set up already.
This article contains the following sections:
- Manage Users List Screen
- Inviting a User
- Exporting a Spreadsheet of Users
- Users FAQ and Troubleshooting
Manage Users List Screen
You navigate to the Manage Users screen by clicking Settings > Manage Users in the left navigation bar. You can use the search tools at the top of the screen to search for users by name or email address and filter results by user role. From this screen you can invite users, remove users, and export a spreadsheet of users.
A table appears with a row for each user in your account. You can control which columns appear in the table by clicking the gear icon to the right of the search. The table contains the following columns:
- Name: The user's name.
- Email: The user's email address. The user uses this to log in to Ringba.
- Role: The user's role. In addition to the roles described in the previous section, you might also see <None> in this column to indicate that you previously removed the user from your account.
- Invitation: The status of the invitation to join the account. This column contains Pending, Accepted, or Expired.
- Can Export Reports: Indicates whether the user has permission to export reporting data from your account. This column contains a green check mark to indicate the user has permission or a red x to indicate the user does not have permission.
- Actions: Icons you use to perform action on the user. See the next section for details.
You can click most of the column headers to sort the users by the value in that field. Click the header again to reverse the sort, and click it a third time to remove the sort. You can use the icons in the Actions column to perform other operations on users from the list screen:
- Remove the user or invitation.
- Copy the invitation URL. This option appears only if the Invitation is Pending. This option lets you copy to the invitation URL so you can send it to the invited user, in case they are having trouble with their email invitation.
Inviting a User
The steps you use to invite a user to your account depend on the user role you want to invite:
- Admin: See the following section
- Report Access: See the following section
- Publisher User: See the Inviting a Publisher User section in the Publishers article.
- Publisher Manager: See the User Groups article for step-by-step instructions.
- Buyer User: See the Inviting a Buyer User section in the Buyers article.
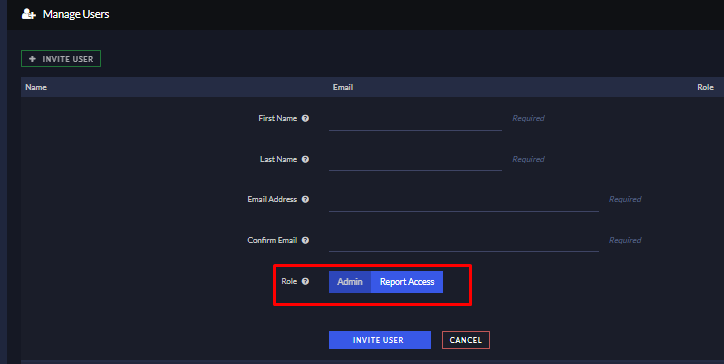
Use the following steps to invite an admin or report-access user:
- Navigate to Settings > Manage Users.
- Click the Invite User button.
-
Configure the user account settings:
- First Name
- Last Name
- Email Address
-
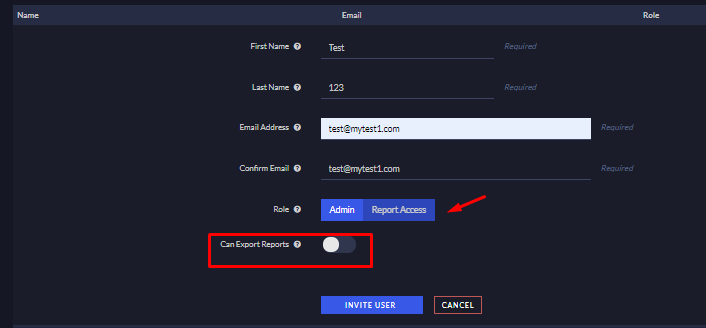
Role: Choose Admin or Report Access to indicate which user type to invite.
-
Can Export Reports: If you choose Report Access as the role, this field appears so you can control whether the user can export reports.
-
Click Invite User.
After you send the invitation, the user receives an email to complete their registration and access their account.
Important: Tell your users to log out of all Ringba accounts before clicking the email link to accept the invitation you send them. Being logged in to another account when accepting an invitation can cause problems with logging in to the new account.
The invitation link expires after 30 days and can be used only once. If the invitation expires, you can delete it from the Settings > Manage Users list screen and send a new one.
Exporting a Spreadsheet of Users
You can export a CSV file that contains a row for each user in your account. The CSV contains the following columns:
- Name: The user's first and last name. You enter these values when you invite a user and the user can change them on the Settings > Profile screen.
- Phone Number: Users can enter their phone number on the Settings > Profile screen.
- Email: The user's email address. Users use this value to log in to Ringba.
-
Role: The user's role in this account. The values in this field correspond to the user roles you see in the Manage Users screen. This column can contain the following values:
- admin: An admin user
- user: A report-access user
- affiliate: A publisher user
- affiliate_manager: A publisher-manager user
- buyer: A buyer user
- buyer_manager: A buyer-manager user
- <None>: A user who you previously removed from your account
- Invitation: The invitation status. This column can contain Pending, Accepted, or Expired.
- Can Export Reports: Indicates whether the user has permission to export reporting data from your account. This column contains Yes or No.
Users FAQ and Troubleshooting
How can I help someone who's having trouble with their invitation?
If the user is not receiving the invitation email for some reason, you can copy an invitation link to send to them directly. Go to the Settings > Manage Users screen, find their user, and click the <> icon under the Actions column to copy the invitation link.
Regardless of whether the email arrives, you should remind your users to log out of any other Ringba accounts where they might be logged in before accepting the invitation you send them. Being logged in to another account when accepting an invitation can cause problems with logging in to the new account.
Why isn't my admin user receiving all the emails and notifications from Ringba?
By default, all admin users in your account receive all emails and notifications from Ringba. However, you can contact Ringba Support to request some or all of the emails and notifications be stopped for an admin. If you are having problems with an admin not receiving emails or notifications, contact support to see whether the user previously requested notifications be disabled.
What should I do if I need help with managing users?
If you have any questions or need additional help with your users, please reach out to our support team via chat or email at support@ringba.com.